AngularJS Tutorial Part 2: Introducing the Star Wars API and Angular Services
August 20, 2016
This is part 2 of a multi-part Intro to AngularJS tutorial series. Part 1 can be found here, and Part 3 can be found here.
Now that we have a Hello World version of our website working, we’ll create a Service in order to connect to the Star Wars API.
First go back to the index.html file, and add the following line to the file. This will include the star wars service to the app.
<!-- Services -->
<script type="text/javascript" src="services/swapi.js"></script>
Next we’ll create a new folder called services, and inside this folder we’ll create a file called swapi.js. In this file, we’ll create an Angular service called Swapi that makes a call to the swapi API and calls for any information we can grab on the different characters from the Star Wars movie.
var services = angular.module("swapi", [])

services.factory("SwapiService", [
  "$http",
  function($http) {
    function Swapi() {}

    Swapi.domain = "http://swapi.co/api"

    Swapi.people = function() {
      var path = "/people"
      var url = Swapi.domain + path

      return $http.get(url).then(function(response) {
        return response
      })
    }

    return Swapi
  },
])
Next you’ll need to update the SwapiApp in app.js so that the angular module knows to include the swapi service. To do this, change the first line in the file to inject the Swapi service.
var angularApp = angular.module("AngularApp", ["ngRoute", "swapi"])After this, we’ll hook the swapi service to our controller. Going back to the main.js, we’ll first inject our swapi service into the array and function call. We’ll then create a call to the SwapiService.people() function we created in our service, and return all the collected data. Your updated code should look like below:
angularApp.controller("MainCtrl", [
  "$scope",
  "SwapiService",
  function($scope, SwapiService) {
    $scope.heading = "Hello World"
    $scope.message = "This is me"

    SwapiService.people().then(function(data) {
      $scope.data = data.data.results
    })
  },
])
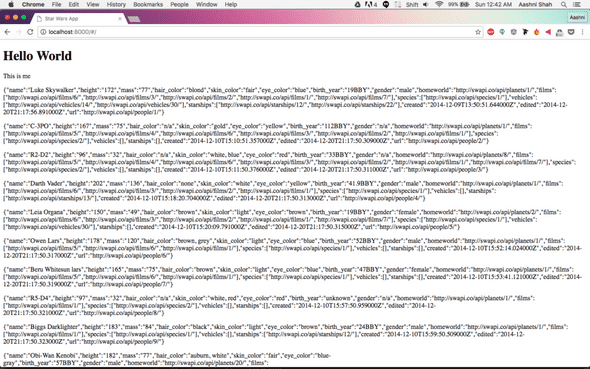
Lastly, we need to update our main view so that we can display the data onto our page. For now we’ll just do a data dump and display everything that our API call returns. Once we have this working, we’ll start doing some more interesting stuff with the data. So, open up the main.html page, and add the following lines of code to the end of the file.
<div>
  <div ng-repeat="person in data">
    <p>{{person}}</p>
  </div>
</div>
One of my favorite features about AngularJS is that you can write for-loops in HTML! That’s what the ng-repeat essentially lets you do. This goes through the $scope.data variable, and for each item in the data block, angular creates a local reference known as person. The <h2>{{person}}</h2> then outputs each persons information as a heading 2.
Let’s go back to our browser and take a look at what’s happened! If everything went as planned, then this is what you should see when you load up http://localhost:8000.
If you think you’ve made a mistake somewhere, you can access a copy of the above code from the accompanying github repository. Click here to see all the code upto the end of this section.
